
Several months ago, I had a can of red spray paint for plastic laying around from a previous

project and decided I’d use it to enhance our obstacle/jump course, and figure out how to paint horse obstacle/jump poles. Since then, I was given three more cans of paint (one that’s fluorescent yellow!), so I’m now working on some more jump poles and figured I’d share the main way I go about painting them, as well as a few other options for having decorated obstacle poles. These make a great addition to your practice course at home; I know the miniature horses on our show string have benefited from using them!


Supplies
-
-
- PVC pipe of the diameter and length you want
- Spray paint suitable for plastic surfaces (one or more colors)
- 1″ masking tape
- Several feet of string (length of the pole or could use a measuring tape instead)
- A pencil
- Two plastic bags (I use bread bags)
- A sandwich bag or regular plastic bag (to protect your hand while spraying)
- Two clothespins
- A couple of paper towels or an old sponge
- Scissors

-
Instructions to Paint Horse Obstacle/Jump Poles
- Read the directions on your spray paint can to make sure it’s an appropriate day for painting!

Don’t spray paint in the wind, even if you’re convinced you’re facing downwind! I did and ended up with red highlights! - Wet a paper towel or and clean any dirt off of the PVC pipe that is to be painted.

Cleaning the PVC pipe - ***For if you want to have a base color instead of white. If not, move on to question number four*** shake up the paint and then put the sandwich bag on your hand to keep the paint off and spray away! I hold one end of the pole up while I spray.

Cover your hand with a sandwich bag or glove to keep the paint off of your hand. - Get a piece of string and cut it to be the same length as the pole. Decide on a width/spacing for your stripes, then use the string to measure even spaces/stripes by folding in half and marking it with a permanent marker or tying knots in the string at appropriate spots. You could also use a measuring tape instead and skip this step, I just find the string to be foolproof, I have a tendency to mess up numbers!

Using a string to measure - Use a pencil to mark the appropriate spots along your rope or measuring tape.

Drawing a line where I will place the tape - Run masking tape around the pipe along the outer-most side of each stripe’s pencil marks (My pictures end here because I realized that previous poles that I had painted with this paint were fading because the paint was NOT for plastic! Make sure you use paint that is for plastic.)
- Make a hole smaller than the pole’s diameter in each of the bread bags and pull them onto the pole, stopping at the middle of the masking tape. You don’t want any paint to leak past the tape, so use a clothespin to secure each bag and keep it out of your way.
- Follow the directions on your spray paint can to get it ready.
- Prop the pole up or just hold one end up with a hand.
- Put the sandwich bag on the hand you’ll be spraying with!! You could also use a rubber glove or bigger plastic bag. Trust me, if you don’t use something, you’ll end up looking like you have chickenpox or something weird going on with your hand for several days. I learned this the hard way after doing my first poles in red!
- Apply second coat after around 10 minutes (or whatever your directions say), if you want.
- Allow it to dry, then move the bags to the next stripe to be painted!

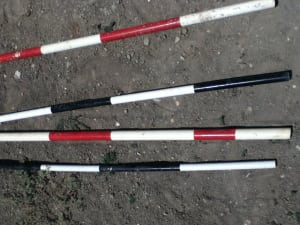
Finished poles (still looking good after months of use!).